Wednesday, 9 December 2009

Riff Raff take 3


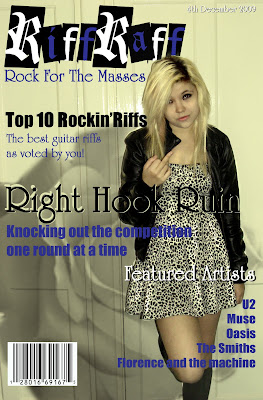
Although I made the appropiate changes to 'Riff Raff' draft 2 the cover was still missing something which i identified as a too simplistic or plain background.
Therefore i decided to experiment with the use of 'Brushes'.
To do this:
1) I first selected the 'brush tool'.
2) I then on the 'drop down list' selected the extension to 'load brushes'.
3) I then loaded the brushes from the appropiate folder in the U drive.
I experimented with the different 'brushes' such as:
'Assorted brushes'
'Basic brushes'
'Calligraphic brushes'
'Drop shadow brushes'
'Dry media brushes'
'Faux finish brushes'
'Natural brushes 2'
'Natural brushes'
'Pen pressure'
'Special effect brushes'
It was the last brush types that I found one that was most suitable for my magazine. The other brushes were either completely inappropiate or were more suited to the hip hop or drum and bass genre of magazine. The brush was of a rose which worked with my rock genre because of the popularity of the image in tattoos or in bands such as Guns and Roses. I changed the brush to black as a black rose challenging the expectations of the red rose of romance opposed to its now negative or darker connotations. I did this by adding a 'New layer' and placing the rose in the left third. I then used the 'rubber tool' to erase the part of the rose that was covering the main image of my model.

Friday, 4 December 2009

Riff Raff take 2


The first draft of Riff Raff was not working effectively either to to with poor colour choice or missing conventions.

To tackle this:

1)The featured artists kicker colour was not effective and blended too much with the the background therefore I decided to change it to white by using the Painr bucket tool'.

2) I then decided to fill in the letters of the masthead blue and white alternately with the 'paint bucket tool' this is so i could tie in my colour scheme of black, blue and white.

3)I then added the missing dateline in white Flair roman with a black drop shadow.
I achieved this by duplicating the 'dateline layer' and putting it behind the first layer and retyping the dateline in black before finally using the 'move tool to achieve the drop shadow.

4) My first draft did not have a barcode therefore by using the search engine 'Google images' I searched for an image of a barcode to 'copy' and Edit -> 'paste' onto my magazine cover in Photo shop. I then used the 'move tool' to re size the image and place in the bottom left because of the excess space there.


Riff Raff cover take 1


Since I had edited the 'Main image' all i needed to do was to deal with the text of the cover. This included the 'Masthead', 'Strap line', 'Cover line', 'Main cover line' and 'Featured artists'.

For the Masthead I used a 'Black Casper' font in size 500 in black. I used bold blue Flair Roman for the strap line. I used black 'Impact' for the kicker of the cover line and a bold blue Flair Roman explanatory. I used bold black Flair Roman for the kicker of the main cover line and the explanatory in blue 'Impact'. I used bold 'Flair Roman'for the kicker of the featured artists in the same colour as the background by using the 'eyedropper tool' and blue 'impact' for the explanatory.
The diferences from my plan is the positioning of the featured artists to the right bottom of the cover to comply with the western eye flow and to make the text seem less like a list.
The 'a' of the 'raff'' was not the same kind of black casper font as the 'i' of the 'Riff'' therefore it offfset the symmetry that i was aiming for therefore i needed to change this. I achieved this by simplfying the masthead ('Simply layer') so it becomes like an image. Then i used the 'rubber tool' to rub out the 'a', (I also rubbed out the part of the masthead that was covering the model so it looks like the model is in front of the mast head following the conventions of successful music magazines). To make it symmetrical i needed to make an 'a' in the style of 'BLack Casper' font - first i used the 'shape tool' to make a rectangle and used the 'paint bucket tool' colour it black. Then i used the 'text box' to enter an 'a' that was the same as the 'i' within the black rectangle. I then used the 'eyedropper tool' and 'paint bucket tool' to change the 'a' ('Cloister black')into the same colour as the background( I then 'link layers'). Finally i used the 'move tool to resize and reposition so that the 'a' is slanted like the 'i' and in the masthead.

Photos taken and edited part 4

For this photo I wanted to convey the true rock spirit of rebellion and attitude therefore i asked my model to give an offensive gesture to the camera. This sentiment is supported by the models costume- the leopard print dress bears connotations of wildness and the leather jacket is often associated with the rock culture a an icon of a disregard for rules and morals.
1) 'Crop' - i decided to crop the right side of the photo so that I could get rid of the door handle.
2)'Enhance -> auto levels' - the program automatically corrects average issues of the level of contast/lightness and tonal so I don't need to worry about it.
3) 'Enhance -> auto contrast'- the program automatically fixes the contrast levels so i don't need to worry about it.
4) 'Enhance -> Adjust lighting -> shadow/highlights'- I slightly increased the light and the dark tones to make the the image more clearer with better lighting/tones.
5) 'Adjustment layer (hue/saturation)-> photo filter x3- I adjusted the colour of the image giving it slight orange, black and yellow/green hues to make the location and the model look visually more appealing fixing the quality of the skin tone giving it an overexposed look.
6) 'Burn tool' - I used the tool to darken the models eyelashes and eyeliner to bring attention to her eyes emphasising her challenging/questioning stare. I darkened the models roots to support the overexposed effect.
7) 'Blur tool' - I used the tool to smooth out the models skin to fix any blemishes or textures that were an issue.

Photos taken and edited part 3


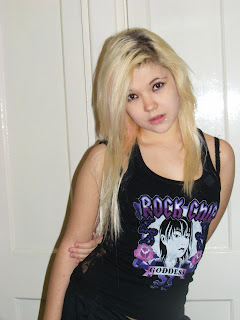
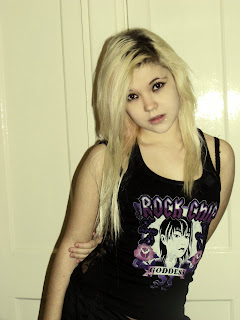
For this photo I decided to try a very obvious rock feel shown by the mock innocent pose and vest top that literally spells it out to the reader that she is a rock model. However I found the pose and the costume to be too obvious and therefore very amateur and low quality therefore I will not be using this photo.

1) 'Enhance -> auto levels' - the program automatically corrects average issues of the level of contast/lightness and tonal so I don't need to worry about it.
2) 'Enhance -> auto contrast'- the program automatically fixes the contrast levels so i don't need to worry about it.
3) 'Enhance -> Adjust lighting -> shadow/highlights'- I slightly increased the light and the dark tones to make the the image more clearer with better lighting/tones.
4) 'Adjustment layer (hue/saturation)-> photo filter x3- I adjusted the colour of the image giving it slight orange, black and yellow/green hues to make the location and the model look visually more appealing fixing the quality of the skin tone giving it an overexposed look.
5) 'Burn tool' - I used the tool to darken the models eyelashes and eyeliner to bring attention to her eyes emphasising her challenging/questioning stare. I darkened the models roots to support the overexposed effect.
6) 'Blur tool' - I used the tool to smooth out the models skin to fix any blemishes or textures that were an issue.

Photos taken and edited part 2


For this photo I wanted a more bolder obvious rock pose.This is shown through the models informal stance which suggests a lack of concern for rules and conventions supported by her casual costume.


After I taken the photo I needed to edit it:


1)'Enhance -> auto levels' - the program automatically corrects average issues of the level of contast/lightness and tonal so I don't need to worry about it.
2) 'Enhance -> auto contrast'- the program automatically fixes the contrast levels so i don't need to worry about it.
3) 'Enhance -> Adjust lighting -> shadow/highlights'- I slightly increased the light and the dark tones to make the the image more clearer with better lighting/tones.
4) 'Adjustment layer (hue/saturation)-> photo filter x3- I adjusted the colour of the image giving it slight orange, black and yellow/green hues to make the location and the model look visually more appealing fixing the quality of the skin tone giving it an overexposed look.
5) 'Burn tool' - I used the tool to darken the models eyelashes and eyeliner to bring attention to her eyes emphasising her challenging/questioning stare. I darkened the models roots to support the overexposed effect.
6) 'Blur tool' - I used the tool to smooth out the models skin to fix any blemishes or textures that were an issue.

Photos taken and edited part 1


In the first photo I took I decided that i wanted a simple pose so I didn't want any props - I wanted to focus on the direct challenging gaze associated with rock magazine conventions.

The gaze is direct which could be interpreted as a challenge to the reader or a sign of confidence or even arrogance similar to the attitude most rock models adopt especially with the model leaning her head to the left side (rule of left third helps point to the left third and therefore the all important text), which is a questioning pose/body language. I asked the model to have her first costume casual in order to convey that the model isn't concerned about what other people think about her. The location/background is a white doorway which i hoped would naturally frame the model and have few connotations so the reader is not distracted.

After I had taken the photo I needed to edit it:

1)'Enhance -> auto levels' - the program automatically corrects average issues of the level of contast/lightness and tonal so I don't need to worry about it.

2) 'Enhance -> auto contrast'- the program automatically fixes the contrast levels so i don't need to worry about it.

3) 'Enhance -> Adjust lighting -> shadow/highlights'- I slightly increased the light and the dark tones to make the the image more clearer with better lighting/tones.

4) 'Adjustment layer (hue/saturation)-> photo filter x3- I adjusted the colour of the image giving it slight orange, black and yellow/green hues to make the location and the model look visually more appealing fixing the quality of the skin tone giving it an overexposed look.

5) 'Burn tool' - I used the tool to darken the models eyelashes and eyeliner to bring attention to her eyes emphasising her challenging/questioning stare. I darkened the models roots to support the overexposed effect.

6) 'Blur tool' - I used the tool to smooth out the models skin to fix any blemishes or textures that were an issue.

Wednesday, 2 December 2009

Main image photoshoot plan

After I had completed the Magazine mock up cover I needed to then start to plan a Photo shoot for my main image. I planned to have the model pose with a guitar and without a guitar in several 'rock style' poses to see which one was most effective or suited to my magazine. To do this I also had the model have several costume changes so that I could see which was most suited to the 'rock look' I was aiming to achieve.